Once you got to grips with simply gybing your kite surfboard you’ll want to start increasing the speed and power – the fast and aggressive turning of the kite will be the key!
These powered carving turns, best learnt on flatter water, are the perfect way to master the skills required when you drop into a wave and start your powered bottom turn.
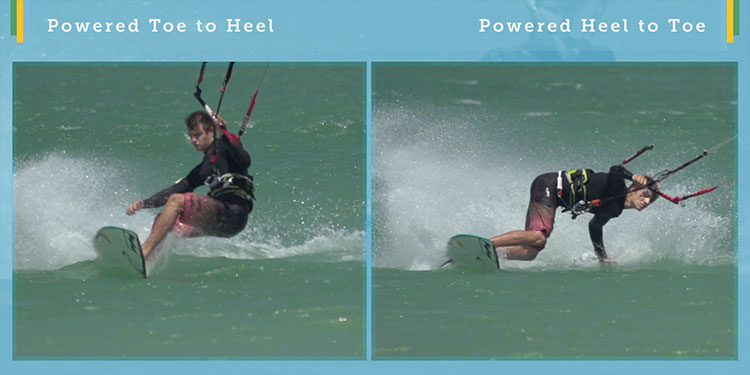
The kite movements do differ slightly depending on whether you start on the toeside or heelside. You can handle far more power when performing a heelside to toeside powered carve and thus the kite movements can and should be more extreme.
Check out the follow excerpt from our Heelside To Toeside Powered Carves premium video. It covers a small part of the Key Elements : Kite & Bar section:
Video Recap – Powered Kite Movement
So let’s recap what we’ve seen in the video and then we can briefly touch on a few other key elements.
What you need to do:
We’re looking at the start of the turn and the kite movement that will power us throughout.
- Start with the kite really low
- Pull hard with your backhand so the kite turns in a tight arc around one tip
- Allow your board to come upright, with this lighter kite pull
- Level the bar as the kite is pointing diagonally across the powerzone
- Allow the kite to fly through the powerzone
- As soon as you feel the kite’s power increasing transfer weight to your toeside edge and start the board carving
Why you need to do it:
So why do we need the kite so low? Partly it’s because we can, we have a lot of control of the board when we are driving off our toeside edge, so we can handle a lot of power. And with the kite so low, we can use all our weight to counteract the pull from the kite and transfer that energy into forward speed in the board. If the kite was high it would be trying to pull us up off the board.

You’ll see a difference between the kite position in a powered heelside to toeside turn compared to the toeside to heelside version. Carving on our heelside edge is harder due to the mechanics of our bodies, making it hard to react to changes in the power and get our body as low and committed to the turn. For this reason, the toeside to heelside carve, essentially a backside bottom turn, requires the kite to be fly slightly higher through the powerzone.
Other Key Elements to Consider
Now this excerpt video is only a small part of the full Heelside to Toeside Powered Carves video, there is obviously a lot more going on with your board, legs, body, and kite. We cover them all in detail in the full video but here are a few additional brief pointers:
- Sheet the bar out as your start the carve and the power really kicks in. The initial pull of the kite will give you acceleration but you can then sheet out to maintain just the right about of power through the turn.
- As always, ensure your back foot is right at the back of the tail pad and your weight is low with legs bent.
- You can lean right into the turn, edging hard, with your whole body stack. Your weight is balanced between your feet but slightly more weight is over your front foot and your back foot is driving the tail of the board around.

What maybe thought of as just a simple carving turn, is actually a complex series of actions, many happening simultaneously. Whether you are starting on your heelside or toeside requires you to tweak your skills to make the turns the best can they can be. That’s why we’ve created such a detailed series of videos – check out our Carving Turns Collection for the definitive in-depth guide to all aspects of surfboard turns, gybes, carves and everything in between!
You can also find our free Playing in Waves video, exclusive to the Progression Player App. This video is the bridge between carving turns on flatter water and actually riding waves.
If you have any questions, related to any type of carving turns, ask away in the comments.