In a previous post, we explained the different types of twintip kiteboards and the features that make them perform the way they do. Now you’ve chosen a board you might be a little uncertain as to what the best setup is for your footstraps and pads. In the past, this was limited to simply how wide your stance would be (ie. how far apart you place the pads/straps), as all other aspects were fixed, but in the last few years board manufacturers have created systems that allow you to adjust every aspect of this positioning:
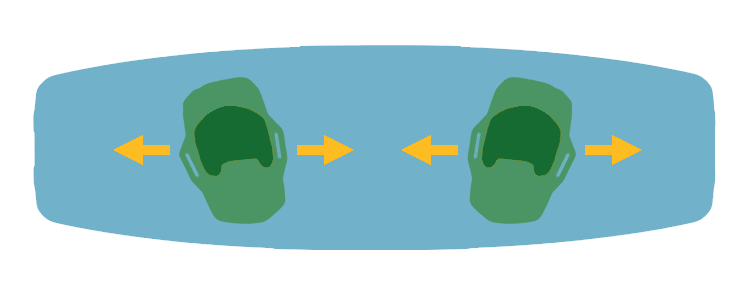
- Pad distance – the distance between the left and right pad/straps and their relation to the length of the board
- Pad angle – the angle of the pads in relation to each other
- Pad position – the position of a single pad in relation to the width of the board
- Strap width & fit – the width of the inside of a single strap
In this article, we’re going to help you to understand each and how the combination of these features will allow you to get the best out of your board.
Pad Distance
The general rule of thumb for your initial setup is that taller people, with longer legs – have them further apart; Shorter people have them closer together. Which probably means for most of you somewhere in the middle is a good starting point.
But there are a few other areas to consider:
- A wider stance will allow you to handle more power and give you more stability when you land from jumps. It’s particularly good for people riding wakestyle boards, looking to get lots of pop and who are landing hard from powered tricks.
- A narrower stance is more manoeuvrable, giving a board a looser feel, hence why it’s better for people playing around with carving turns in waves, learning sliding turns or riding toeside.
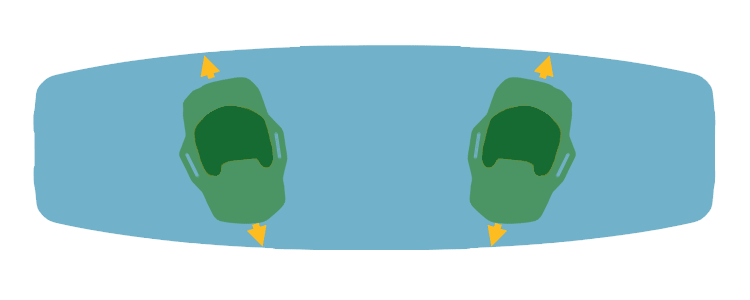
Pad Angle

Firstly, remember that you want to keep the angle the same for both feet – we don’t ride our kiteboard twintips like snowboards where you might make your front foot more angled than the back. Why? In snowboarding, most people will ride the board with their left or right foot always leading where as on a kiteboard, we ride on our heelside edge in both directions, most of the time.
As a starting point about 10 degrees is a good option for most people but again the angle of the pad can give different benefits:
- Having your feet more parallel primarily helps when landing hard, giving you more stability and reduces some pressure on your knees. Though it’s not so comfortable simply cruising along.
- Having your feet more ducked (angled) will increase the manoeuvrability of the board and feel more conformable for general riding
Pad Position
For most boards & people you’re going to have the pads so they are centred in relation to the width of the board. The ability to change this side to side position is helpful for people with smaller or bigger feet to allow you to position the pad so your feet are centred on the board ie. your heel and toes are similar distances from the heelside and toeside edges.
You can play with putting the pads closer to the heelside rail. It can help with edging harder, making jumps and carving on your heelside easier, but the downsides are it’s not so balanced, so general riding can be less stable and riding toeside is more difficult.
Strap Width & Fit
You want your feet to be snug in the straps; they shouldn’t slip out too easily, you shouldn’t have to pull your toes up to keep the board on and when you put your feet in them you should need to give them a wiggle to get them solid.
When you slip your foot into a footstrap you ideally want your foot to be touching the strap on all side of the foot, not just the top section. If you find it hard to keep the board on your feet, have tried different tightness of the actual strap, then it maybe you need a narrower strap setup.
Some strap/pads allow you change the overall width of the strap and making it narrower maybe helpful for those people with narrower/small feet.
None of this is overly complicated but it just requires a little trial and error to see what works best for your body and board combination. You may be surprised just how much you can increase the performance and handling of your board by just experimenting with a few millimetres here, and the odd degree there.
If you want to also get some more in-depth help with tuning your kite and bar then check out our Tuning video, part of the Intermediate Volume 1 Collection and DVD. It covers all the handling characteristics you may experience if your kite is flying badly and hopes to show you what is wrong, why and how to fix it. Get it now on the Progression Player App.